Burn Tutorial#
See here for video tutorials: [LuatOS] ① Burning Tutorial
Serial Burn#
Preparations:
A USB cable for a typec port
A window system computer (recommend win10 or above)
Tool Configuration#
First download the latest version of the Luatools:click me to download
It is recommended to create a new Luatools folder, put the exe file into it, and then open the exe file.
Please check Universal Serial Print

Modify the universal serial port baud rate and set the baud rate to 921600, which is the log baud rate. The baud rate is automatically set by the tool..
Connect the device to the computer through the usb cable, you can see a new COM port, select this COM port in the tool and open it
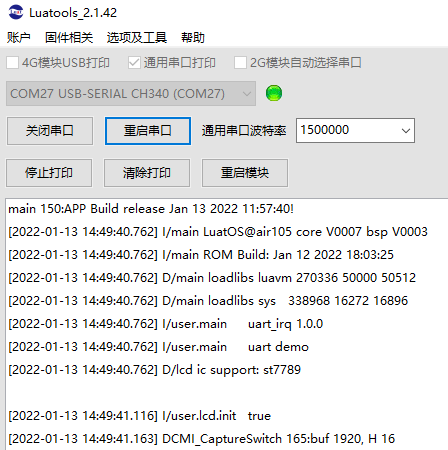
Please check Universal Serial Print
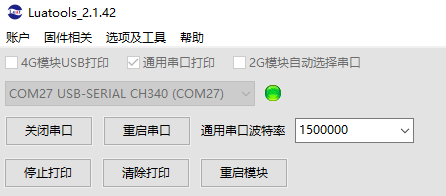
Modify the universal serial port baud rate and set the baud rate to 1500000, which is the log baud rate. The baud rate is automatically set by the tool..
Connect the device to the computer through the usb cable, you can see a new COM port, select this COM port in the tool and open it
Please check Universal Serial Print
No need to modify the serial port baud rate, keep the current value can be
Connect the device to the computer through the usb cable, you can see a new COM port, select this COM port in the tool and open it
Please check Universal Serial Print
Modify the universal serial port baud rate and set the baud rate to 921600, which is the log baud rate. The baud rate is automatically set by the tool..
Connect the device to the computer through the usb cable, you can see a new COM port, select this COM port in the tool and open it
Please check 4G module USB print, this series is compatible with EC618 schemes such as Air780E/Air780EG/Air600E/Air700E
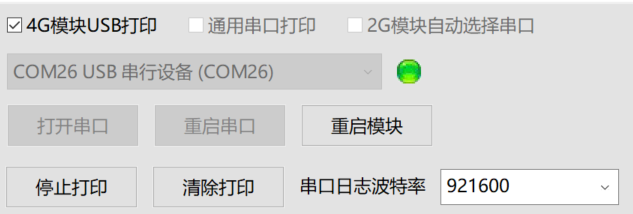
No need to modify the serial port baud rate, keep the current value can be
Connect the device to the computer via a usb cable, there are several situations:
Three new COM ports appear, and the tool will automatically open the ports to prove that the current
AT firmwareThree new COM ports appear, and the tool will automatically open the port to prove that it is current
CSDK or LuatOS firmwareThere is no response. Press and hold the PWR key of the board for more than 2 seconds, and the board will be turned on. There are 3 buttons on the development board. If there is no logo, try both on the outside.
Reminder: does not support Win7 brush machine!!
Please check Universal Serial Print
Modify the universal serial port baud rate and set the baud rate to 921600, which is the log baud rate. The baud rate is automatically set by the tool..
Connect the device to the computer through the usb cable, you can see a new COM port, select this COM port in the tool and open it
Burn Firmware#
Need to get firmware before burning
Find the folder where the Luatools is located. The official firmware downloaded automatically in the folders Luatools/resource/101_lua_lod or Luatools/resource/103_lua_lod`
Find the folder where the Luatools is located, and the official firmware downloaded automatically is in the folders Luatools/resource/105_lua_lod`
Find the folder where the Luatools is located. The “Luatools/resource/esp32c3_lua_lod/Version Number” in the folder is the official version firmware downloaded automatically.
Find the folder where the Luatools is located. The folders Luatools/resource/esp32c3_lua_lod/Version Number without the words **USB`** is the official version firmware downloaded automatically.
Important
The driver of CH343 must be installed to download the firmware normally. The default CDC driver prints the log without any problem, but the download fails if the speed is too slow. Drive portal
Find the folder where the Luatools is located, and the official version firmware downloaded automatically is in the Luatools/resource/618_lua_lod/version number of the folder
Important
Common brushing process (startup anti-shake off state):
Operation during burning: first press and hold the BOOT key, then press the reset key, and finally release the BOOT key
You can enter the BOOT mode and wait for burning, and it will automatically exit the BOOT mode in about 30~45 seconds.
“The process of starting the anti-shake function “on state, which is usually the result of AT firmware running.:
Plug and unplug USB first, so that the device is turned off
Press and hold the BOOT button (the outer one), then press PWR (the outer one) for 2 seconds, and release the BOOT button
After entering BOOT mode, about 30~45 seconds will exit BOOT mode
After the machine is brushed, if it is not turned on automatically, it needs to be turned on manually.
How to turn off the “boot anti-shake function”? Choose one
Brush script
Luatools/resource/618_lua_lod/version number/demo/gpio/gpio/main.luaIn the main interface, click Firmware Download and brush the flashing light
Luatools/resource/618_lua_lod/Version Number/Functional Test Firmware/Flash Test _xxx.socAt the beginning of your own main.lua, add
pm.power(pm.PWK_MODE, false)
Find the folder where the Luatools is located. The “Luatools/resource/esp32s3_lua_lod/Version Number” in the folder is the official version firmware downloaded automatically.
Important
The driver of CH343 must be installed to download the firmware normally. The default CDC driver prints the log without any problem, but the download fails if the speed is too slow. Drive portal
You can also go to the official LuatOS warehouse to download the latest firmware.
The official version can be downloaded from the release page.:
You can also use the official cloud compilation function to customize the modules included in the firmware.
Cloud Compilation Tutorial Point I View
After downloading the firmware, decompress it to obtain the corresponding firmware.
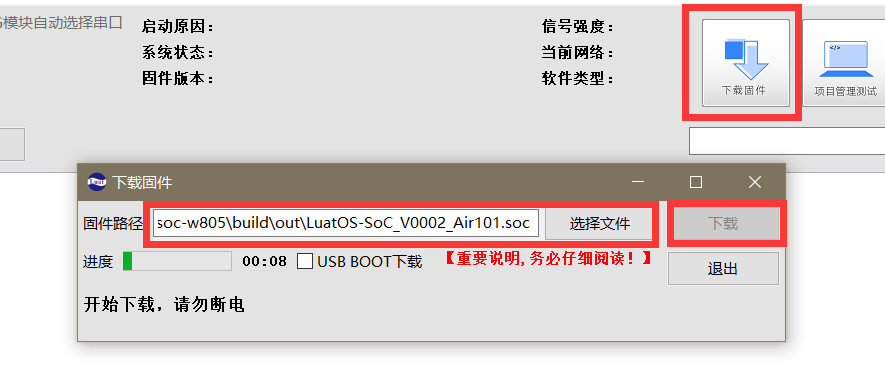
Firmware is a file called “soc`. Here, Air101 firmware is used as an example. It looks like this:
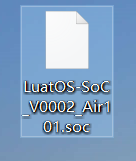
Then return to the Luatools, click the Download Firmware button, select the soc file just downloaded, and download it directly:
Burn Script#
Click the Project Management Test button and click Create Project in the bottom left corner to create a new project
Select the firmware used by the chip and select the script to download it.
demo Class script, can go to LuatOS official repository, can be found in the demo folder
Luatools The tool also automatically downloaded some example scripts of the official version, which can be seen in the resource \certain model \certain version \demo folder, and can be directly selected for burning test
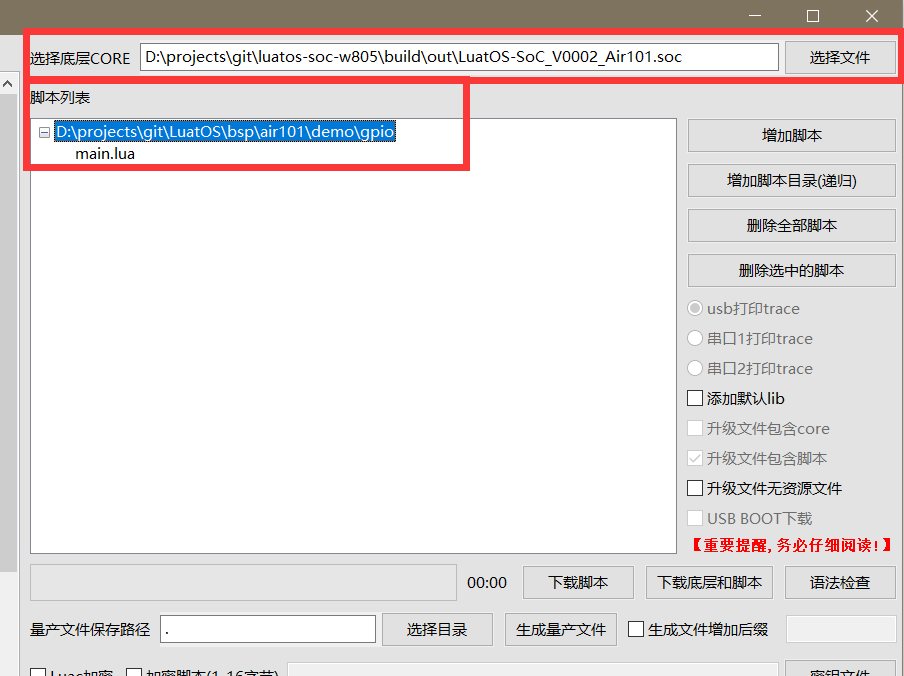
If the firmware version currently burned by the chip is the same as the firmware selected here, you can click “Download Script” to download only the script. On the contrary, it is recommended to click “Download Bottom Layer and Script” to perform full brushing.
View Log#
If the serial port is not opened, click “Open Serial Port” to view the log
If there is no response, check whether universal serial port printing is checked, reselect serial port to open, or try clicking restart serial port